You can import a VMware VMDK to Proxmox VE. You can create a new VM, import the VMDK, attach the disk, and boot the old operating system. This guide shows each step and also covers common problems after migration.
Quick Answer: How Do You Run a VMDK on Proxmox?
The basic process is simple:
- Shut down the VMware VM.
- Copy the VMDK to the Proxmox server.
- Create a new VM in Proxmox.
- Import the VMDK with
qm importdisk. - Attach the disk and set the boot order.
- Start the VM and test the OS and network.
Proxmox VE supports importing external disk images with the qm importdisk command. The source image must be supported by qemu-img. Proxmox VE
What Is Proxmox VE?
Proxmox VE is an open-source platform for running virtual machines and containers. It is based on Debian Linux and uses KVM for virtual machines and LXC for containers. Proxmox VE
One reason many people like Proxmox is its simple web interface and open-source model. It works well for home labs, test systems, development, and production servers.
I would not say that Proxmox is better for every job. But it is one of the strongest choices when you want a flexible virtualization platform without a software license cost. Proxmox also offers paid support subscriptions.
[INTERNAL LINK: Proxmox home lab guide]
Can Proxmox Run a VMware VMDK?
Yes. Proxmox can import a VMware VMDK and use it as a virtual disk.
You do not normally need to install the operating system again. The operating system stays on the VMDK. Proxmox only needs to use that disk inside a new virtual machine.
Think of the VMDK as the hard disk of your old VMware computer. You are moving that hard disk to a new virtual computer.
There is one important point. The virtual hardware changes during the move. Because of this, the operating system may see a different network card, disk controller, or boot device.
What Do You Need Before VMware to Proxmox Migration?
Before you start, collect a few basic details.
1. Your VMware VMDK
You need the virtual disk file from the VMware VM.
Some VMware VMs use more than one disk file. Some also have snapshot files. Do not copy only one file when the disk depends on other files. When you have multiple files, you can export that VM as OVF and you will get one VMDK file.
2. A Proxmox VE server
Your Proxmox host needs enough CPU, RAM, and storage for the VM.
3. Enough storage
Check the size of the virtual disk before you import it.
For example, a 60 GB virtual disk needs enough free space on the target Proxmox storage.
4. The old VMware VM settings
Before shutdown, write down:
- CPU count
- RAM
- Disk size
- BIOS or UEFI mode
- Network settings
- IP address
- Operating system
This small checklist can save time later.
How to Import VMware VMDK to Proxmox VE
Now we can do the actual migration.
Step 1: Shut Down the VMware VM
First, shut down the old VM.
Do not copy a disk while the guest is writing important data unless you have a clear reason to do so. A clean shutdown gives you a safer starting point.
Also check for VMware snapshots before copying the disk. Snapshot files hold changes made after a snapshot. VMware documents snapshot consolidation as the process that merges snapshot changes back into the parent disk. Support Portal
For a clean migration, remove or consolidate snapshots before you copy the final disk.
Step 2: Export and Copy the VMDK to Proxmox
Export the VM using export OVS in VMware workstation.
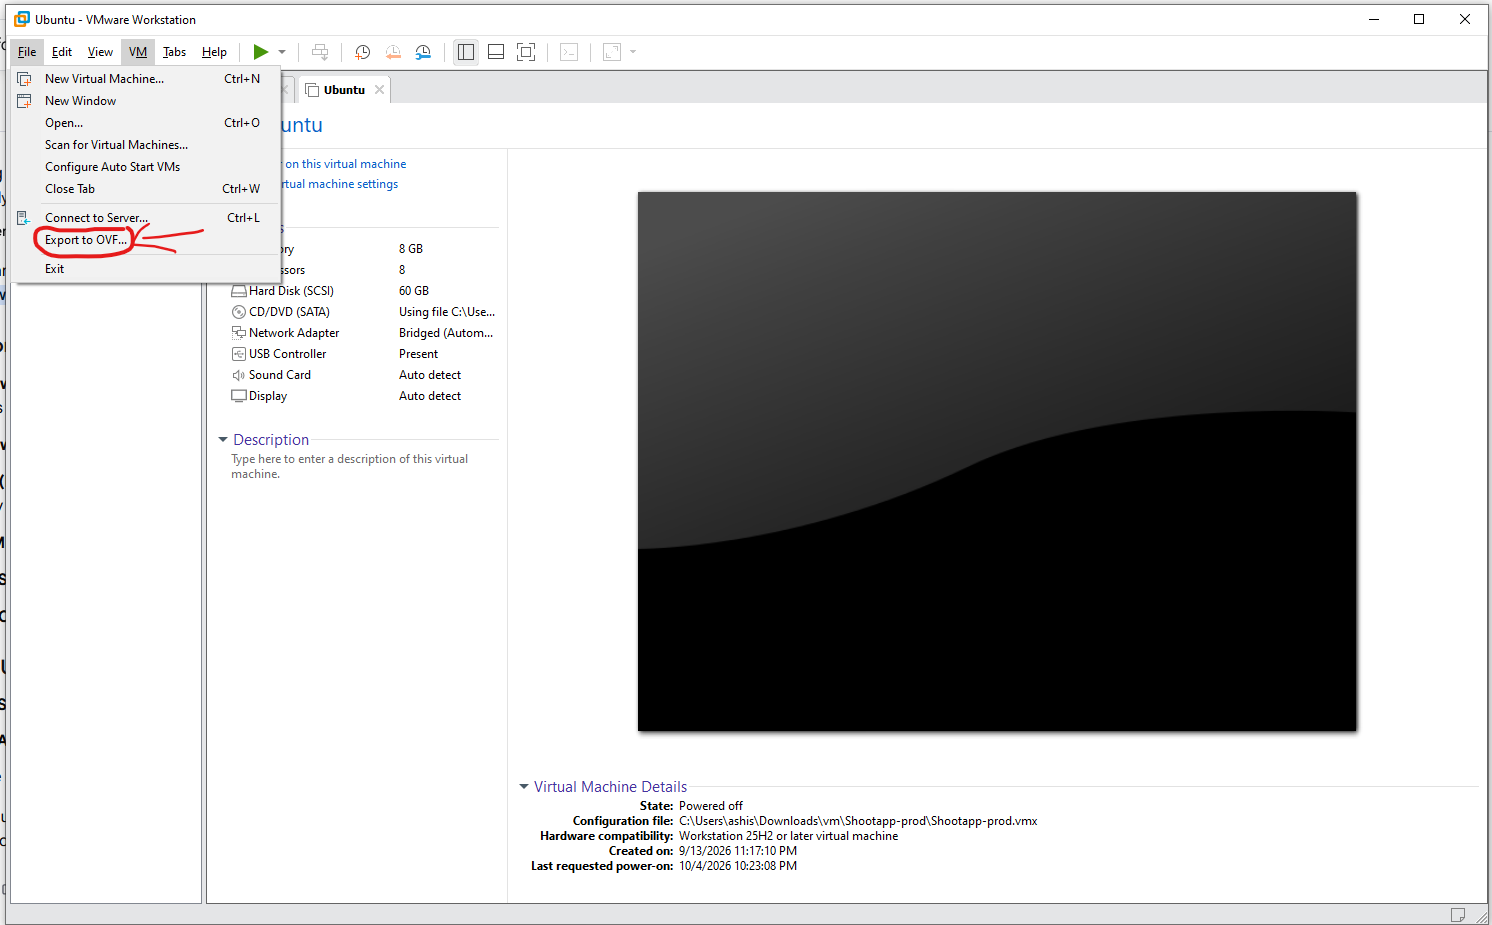
You can use SCP, SFTP, WinSCP or my favourite FileZilla client.
Option 1 – if you are using filezilla just put your IP, Usename, password and Port (whatever port you are using to access the Proxmox).
Then upload the file to /var/lib/vz/dump folder.
/var/lib/vz/dumpFor example:
scp ubuntu-server.vmdk root@PROXMOX_IP:/var/lib/vz/dumpReplace the file name with your real VMDK file.
If you use Windows, WinSCP is often easier than SCP.
After the copy, check that the file exists:
ls -lh /root/ubuntu-server.vmdkYou should see the VMDK and its file size.
Step 3: Create a New VM in Proxmox
Open the Proxmox web interface.
Click:
Create VM
Give the VM a name.
For example:
VM ID: 100
Name: ubuntu-server
For the operating system, do not attach an installation ISO.
The goal is to use your old disk.
Set the CPU and RAM close to the old VMware VM.
For the network card, VirtIO is a good choice for many modern Linux guests.
If you are unsure about the old VM hardware, keep the first boot simple. You can improve the virtual hardware after the VM works.
Step 4: Import the VMDK
Now connect to the Proxmox server using SSH.
Run:
qm importdisk 100 /var/lib/vz/dump/Ubuntu_64-bit-disk1.vmdk local-lvmHere:
100is the Proxmox VM ID./root/ubuntu-server.vmdkis your VMDK file.local-lvmis the target Proxmox storage.
Proxmox documents qm importdisk <vmid> <source> <storage> for importing an external disk image as an unused disk. Proxmox VE
You may see a result similar to:
Successfully imported disk as 'unused0:local-lvm:vm-100-disk-0'This means the disk import worked.
Step 5: Attach the Imported Disk
Go back to the Proxmox web interface.
Open:
VM 100 → Hardware
You should see something like:
Unused Disk 0Select it and click Edit.
Attach the disk as a virtual disk.
For many Linux systems, SCSI with VirtIO SCSI is a good option.
For a first boot, you can also use SATA if you want to reduce hardware changes.
Step 6: Set the Boot Disk
Go to:
VM → Options → Boot Order
Select your imported disk.
Move it to the top.
For example:
scsi0The imported disk must be the first boot device.
Step 7: Start the VM
Start the VM.
Open the VM console from Proxmox.
Watch the boot process.
You want to see your old operating system start normally.
For Linux, check that you can reach the login screen.
For Windows, check that the system reaches the desktop.
What Should You Check After the VM Starts?
A successful boot is only the first test.
Check these items:
1. Check the disk
Make sure the original files and folders are present.
2. Check the network
Run:
ip addrThen:
ip routeMake sure the VM has the correct IP and default gateway.
3. Check the hostname
Run:
hostnameMake sure the VM still has the expected name.
4. Check your applications
Start the main applications running on the old VM.
A VM can boot correctly while an application still has a problem.
For example, a server may contain Docker, a database, a web application, and a reverse proxy. Each service should be checked after migration.
[INTERNAL LINK: Docker troubleshooting after VM migration]
Why Can the Linux Network Interface Change?
This is one of the most common surprises after a VMware-to-Proxmox move.
The virtual network card is different.
For example, your old VMware VM may show:
ens33After migration, Proxmox may show:
ens18The operating system sees a new virtual device.
If your old network configuration still points to ens33, the new interface may not receive the expected settings.
This can leave the VM with DHCP or no network at all.
How Do You Fix a Static IP After Migration?
On Ubuntu systems using Netplan, you can define the interface, IP address, route, and DNS settings in a YAML file. Netplan supports static addresses and default routes in this way. Netplan
For example:
network:
  version: 2
  ethernets:
    ens18:
      dhcp4: false
      dhcp6: false
      addresses:
        - 192.168.1.26/24
      routes:
        - to: default
          via: 192.168.1.1
      nameservers:
        addresses:
          - 8.8.8.8
          - 8.8.4.4
Change these values to match your network.
Do not copy this IP address unless it is valid for your network.
Check the configuration:
sudo netplan generateThen apply it:
sudo netplan applyAfter that, check:
ip -4 addrAnd:
ip routeImportant: If you are connected over SSH, be careful when changing the network. A wrong IP or gateway can disconnect you.
[INTERNAL LINK: Ubuntu static IP configuration guide]
What If the VM Does Not Boot After VMDK Migration?
There are several possible causes.
1. The Wrong Disk Is First
Check:
VM → Options → Boot Order
Put the imported disk first.
2. BIOS and UEFI Are Different
Your VMware VM may have used BIOS or UEFI.
Check the old VMware settings and use the matching boot mode in Proxmox.
Changing boot mode can make an otherwise good disk appear unbootable.
Linux Shows Filesystem Errors
Sometimes a migrated Linux VM may show filesystem errors during boot.
You may see messages about:
EXT4-fs erroror filesystem checks.
In this case, stop the VM and check the filesystem from a suitable recovery or live environment.
Do not run repair commands on a mounted root filesystem unless the tool and situation support it.
[INTERNAL LINK: How to repair an Ubuntu filesystem after VM migration]
What If Docker Applications Stop Working?
Docker adds another layer to the migration.
The operating system can work while Docker services still have problems.
Start with:
sudo docker ps -aLook for containers that are:
Upor:
Restartingor:
ExitedThen check the logs:
sudo docker logs CONTAINER_NAMECheck the database, Redis, web application, and reverse proxy one by one.
Do not immediately remove containers or volumes. Application data can be stored in Docker volumes.
[INTERNAL LINK: Docker migration guide]
Why Does Nginx Say “host not found in upstream”?
A common Docker error looks like this:
host not found in upstream "web:8000"This means Nginx cannot find the Docker service named web.
Docker Compose uses internal DNS for service names. Containers on the same user-defined network can normally reach each other by service name. Docker Documentation
For example:
nginx
  |
  | web:8000
  v
web container
Both containers need to share the correct Docker network.
You can check the networks with:
sudo docker network lsThen inspect a container:
sudo docker inspect shootapp-webIf the proxy and web container are not on the same network, the name web may not resolve.
Docker recommends checking the network configuration and confirming that the containers are attached to the same network when a service cannot reach another service. Docker Documentation
[INTERNAL LINK: Fix Nginx upstream errors in Docker]
VMware vs Proxmox After Migration
The operating system stays on the disk, but the virtual hardware changes.
| Area | VMware | Proxmox |
|---|---|---|
| Virtual disk | VMDK | Proxmox disk storage |
| Hypervisor | VMware | KVM/QEMU |
| Linux network | VMware virtual NIC | Proxmox virtual NIC |
| VM management | VMware tools | Proxmox web interface |
| Virtual CPU | VMware virtual CPU | QEMU/KVM virtual CPU |
| Storage controller | VMware controller | SCSI, SATA, VirtIO, etc. |
The biggest change is usually the virtual hardware.
That is why a VM can boot, but its network or application settings may still need changes.
Should You Convert VMDK Before Importing It?
Usually, you do not need to convert the VMDK first.
The Proxmox qm importdisk command can import external disk images and can use supported image formats. Proxmox VE
So this is often enough:
qm importdisk 100 /root/ubuntu-server.vmdk local-lvmConverting the disk can still be useful in some cases.
For example, you may want a different disk format or a different storage design.
For a normal migration, try direct import first.
Common VMware to Proxmox Migration Mistakes
| Problem | Common reason | What to check |
|---|---|---|
| VM does not boot | Wrong boot disk | Boot order |
| Linux network is missing | NIC name changed | Netplan |
| Wrong IP address | Old network config | IP settings |
| Filesystem errors | Disk or shutdown issue | Offline filesystem check |
| Docker app fails | Container or network issue | Docker status |
| Nginx cannot find web | Containers lack a shared network | Docker network |
| Disk is missing | Disk was not attached | VM Hardware |
| VM has no data | Wrong VMDK was imported | VMDK and snapshots |
My VMware to Proxmox Migration Checklist
Before Migration
- Back up the VMware VM.
- Shut down the VM.
- Check for snapshots.
- Consolidate snapshots when needed.
- Record CPU and RAM.
- Record the IP address.
- Record BIOS or UEFI mode.
- Copy all required VMDK files.
During Migration
- Create the new Proxmox VM.
- Copy the VMDK to Proxmox.
- Import the VMDK.
- Attach the imported disk.
- Select the correct controller.
- Set the boot disk.
- Start the VM.
After Migration
- Check the operating system.
- Check the disk and files.
- Check the network interface.
- Check the IP address.
- Check the default route.
- Check important applications.
- Check Docker containers.
- Check databases.
- Test the application from another computer.
A Real-World Lesson From a VMware to Proxmox Move
A real migration can look easy at first.
You import the VMDK. The VM starts. The operating system works.
Then you find smaller problems.
For example, a Linux VM may show a new network interface name. An application server may have Docker containers. A reverse proxy may depend on Docker DNS.
This is why migration testing should go beyond the first successful boot.
A good test checks the full application path:
Client
  ↓
Reverse Proxy
  ↓
Web Application
  ↓
Redis / Database
  ↓
Application Data
This approach helps you find problems before users do.
Frequently Asked Questions
Can Proxmox use a VMware VMDK?
Yes. Proxmox can import a VMware VMDK as an external disk image. You create a VM first, then use qm importdisk to import the disk into Proxmox storage. After the import, attach the disk and set it as the boot device. You normally do not need to reinstall the operating system.
Can I migrate a VMware VM to Proxmox without reinstalling?
Yes. You can often migrate the existing VM disk without reinstalling the operating system. The main change is the virtual hardware. After the first boot, check the network interface, boot mode, disk controller, drivers, and application services.
What command imports VMDK into Proxmox?
Use the qm importdisk command. A basic example is qm importdisk 100 /root/server.vmdk local-lvm. Here, 100 is the VM ID, the second value is the VMDK path, and local-lvm is the target storage.
Why does my Linux network interface change after migration?
The virtual network card can change when you move from VMware to Proxmox. Linux may therefore show a different interface name, such as ens18 instead of ens33. If the old network configuration still uses the old name, the expected IP settings may not apply.
Do I need to convert VMDK before importing it into Proxmox?
Usually, no. Proxmox can import supported external disk images with qm importdisk. Direct import is often the simplest method. Conversion can still make sense for certain storage or disk-format needs, but it is not required for every VMDK migration.
What should I check after migrating a VMware VM to Proxmox?
Do not stop after the VM reaches the login screen. Check the disk, boot process, network, IP address, routes, applications, databases, and services. If the VM uses Docker, check container status and logs too. A successful VM boot does not always mean the application is fully working.
Moving a VMware VMDK to Proxmox VE is usually a simple process. Import the disk, attach it to a new VM, set the boot order, and start the VM.
The most common problems come after boot. Check the network, IP address, disk, boot mode, and applications before you call the migration complete.
[INTERNAL LINK: Complete Proxmox migration checklist]